Adding additional fields using a custom module in OpenERP 7
My eyes, the goggles do nothing!


Getting started on OpenERP can be a bit daunting, initially this behemoth can be really painful. However once you get familiar with the system everything is really easy. In this tutorial I’ll go through the steps involved in adding an additional field to an existing model and adding it to an existing view. We’ll also do this by creating a custom module, so we will also cover some of the basics for doing that as well.
Some context you say?
For this example, assume that we are about to migrate out internal project management system to OpenERP, and when we migrate any existing projects over we want an extra field where we can put a reference to the original project management system ID. Essentially modifying the OpenERP project model.
Getting started
We’ll start with a clean install of OpenERP version 7, I wont go into how to install, however I might do so at a later date if there is enough demand. For now you can check out this helpful installation tutorial here. Once the database is set up go to Settings » Modules » Apps and enable the Project management app.
So now that’s done, if you go into the Projects view and click on create you should get something like so.
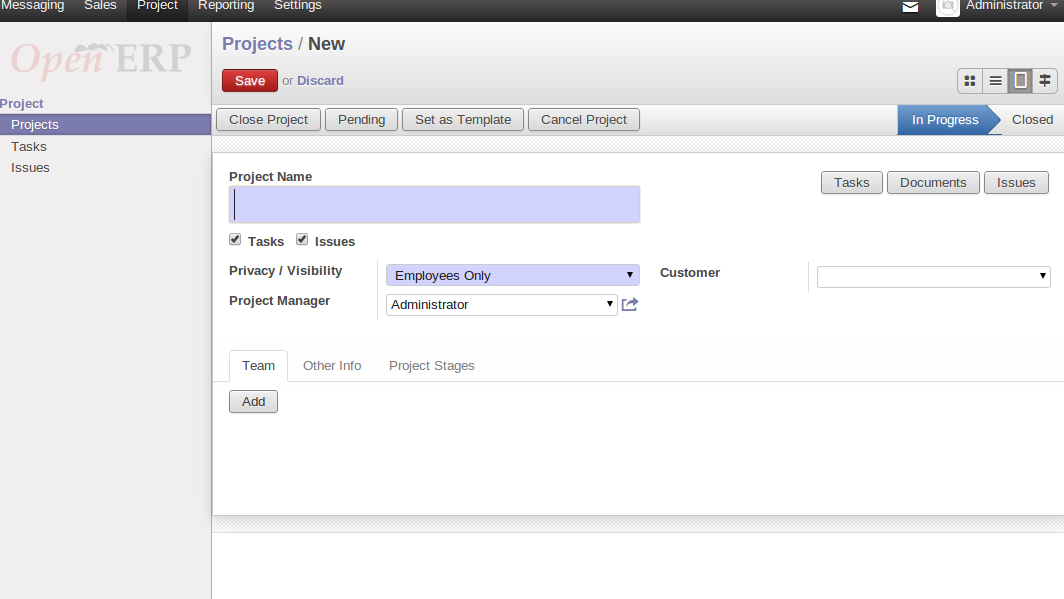
What we want from this view is to add a field under where the customer field is, called Legacy ID right about where I’ve drawn the red block in this image.
So let's get to it.
Where to put things
The module directory in OpenERP is located in the folder /OPENERP_ROOT/openerp/addons you can put your modules in there or symlink them into that directory but to make upgrading OpenERP core cleaner, there’s a better way.
Create a new folder outside of the OPENERP_ROOT folder and call it something useful, I’ve called mine custom_modules
In the newly created module directory create an __init__.py file with the following code.
from openerp.modules import get_module_resource, get_module_pathThis tells the system that this directory will contain addons/modules. Now when we run OpenERP, we have to tell the system about this new additional addons directory. This can be done in the config file (good for production servers) with the addons_path or via the command line (better for development) at start up like so.
python openerp-server --addons-path=openerp/addons,../custom_modulesHowever, if you run this right now, it will fail with the following error
openerp-server: error: option --addons-path: The addons-path '../custom_modules' does not seem to a be a valid Addons Directory!This is because we haven’t actually created any modules there yet, so lets get on with it.
A basic module
Create a new folder in the custom_modules folder and name it legacy_projects. In this folder create an __init__.py file but leave it empty for now. For OpenERP to recognise it We also need to create a module declaration file. In the same folder create a file called __openerp__.py inside this file we will put the following.
{
    'name': "Legacy project integration",
    'version': "1.0",
    'author': "thepearson",
    'category': "Tools",
    'depends': ['project'],
    'data': [],
    'demo': [],
    'installable': True,
}
I wont go into details about this file for now, (you can read up on it here) but suffice to say that it tells OpenERP about our module. Now, if you fire up the server it should kick into action.
Let's do that.
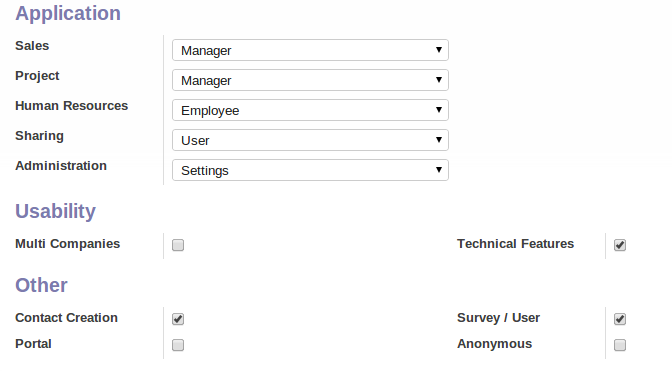
At this point, to help with enabling custom modules it’s useful to enable some permissions on our user account. Log in (with administrator or an account that has administrative privs) and navigate to Settings » Users and edit your user account. Enable the Technical features check-box under usability.
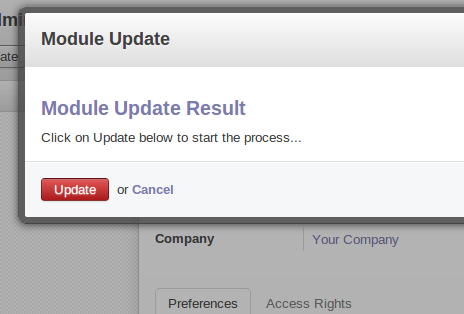
Sweet, save your account and refresh your browser. You should now see a whole bunch of extra menu items on the left. One we are looking for in particular is Update modules list click on that and then click update. This will refresh the system module cache.
Now if we go to the Installed modules section and delete the tag Installed from the search box and search for legacy project the module you just created should display.
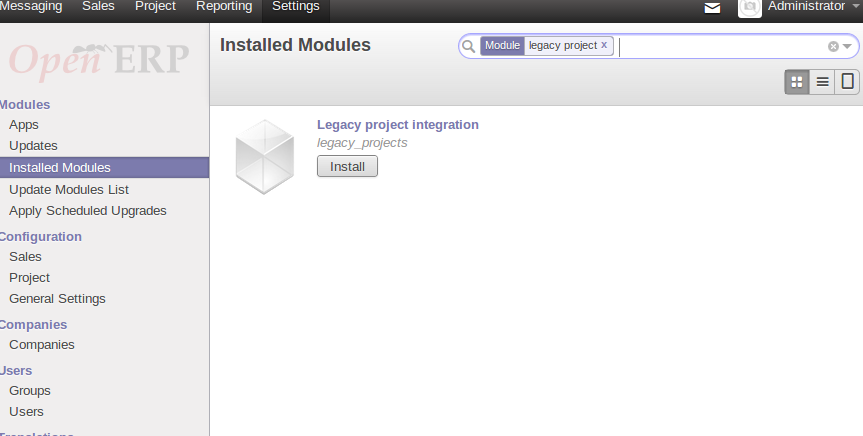
Great, this is how we’d also install the module, but before we do lets make it do something useful first.
Uh, a little help?
Something that makes development in OpenERP a little easier is Developer Mode so let's turn that on now. Log in as administrator, click on the dropdown menu at the top right and then click on About OpenERP in the modal that pops up is an Activate the developer mode link, click on that.
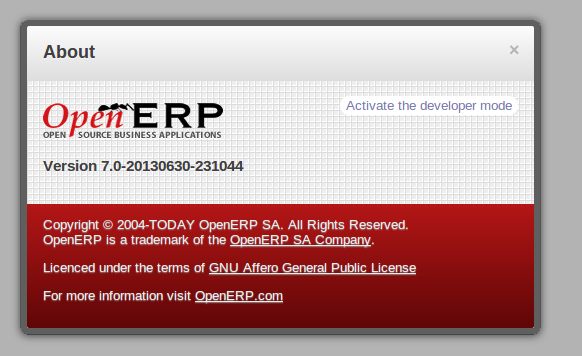
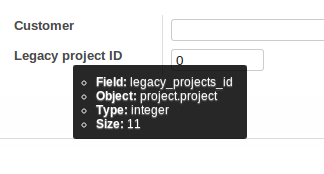
Developer mode gives you the ability to inspect views and models from the interface so you don’t have to go trawling through code and/or database schemas to figure out what’s going on. It gives you a menu at the top of the page with some handy developer links and if you’re looking at a view you want to modify you can hover over a field to see technical information about it, like below.
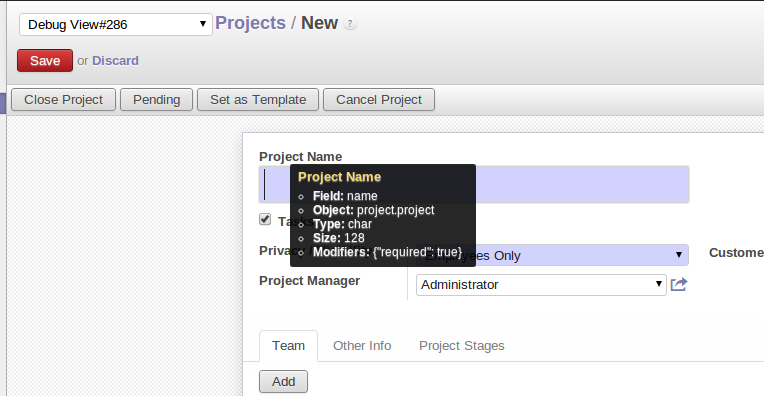
As you can see from that screenshot our model (or object) is called project.projectWe’ll use that in the next step.
Making changes to an existing model
First up we want to tell the OpenERP about the new field, OpenObject is the ORM framework behind OpenERP and adding additional fields to existing models is easy.
First up lets create a file inside our legacy_projects module and save it it legacy_projects.py. We also need to tell our module to load that file, so in the __init__.py file put the following:
import legacy_projectsSweet, now in the legacy_projects.py file put the following.
from openerp.osv import fields, osv

class legacy_projects(osv.osv):

  _inherit = "project.project"

  _columns = {
    'legacy_projects_id': fields.integer('Legacy project ID', size=11)
  }

  _defaults ={
    'legacy_projects_id': 0
  }

legacy_projects()
In the first line we import the required classes, then we define our class.
The real magic starts with the line _inherit = “project.project basically we are telling the system that our object inherits an existing object.
_columns is where we define our field, legacy_projects_id. I have created it as an integer, gave it a title and set the max length to 11.
There is a bunch of different fields you can add to an object, again I wont go into then but you can find all of them here.
Lastly we define some _defaults for fields. In this instance (while not really helpful, but I put it in for clarity) we default the field legacy_projects_id to 0.
That’s the model/object modifications done now. Time to add the interface.
The user interface
In OpenERP the UI is controlled and formatted using XML files.
In our module folder create a new file called legacy_projects.xml. We also need to let OpenERP know about it, so update the line in the __openerp__.py file that reads:
'data': [],and make it read:
'data': ['legacy_projects.xml'],Now in the legacy_projects.xml file place the following:
<?xml version="1.0" encoding="utf-8"?>
<openerp>
<data>
<record model="ir.ui.view" id="legacy_projects_project">
<field name="name">project.project.form</field>
<field name="model">project.project</field>
<field name="inherit_id" ref="project.edit_project" />
<field name="arch" type="xml">
<xpath expr="/form/sheet/group/group[2]/field[@name='partner_id']" position="after">
<field name="legacy_projects_id" />
</xpath>
</field>
</record>
</data>
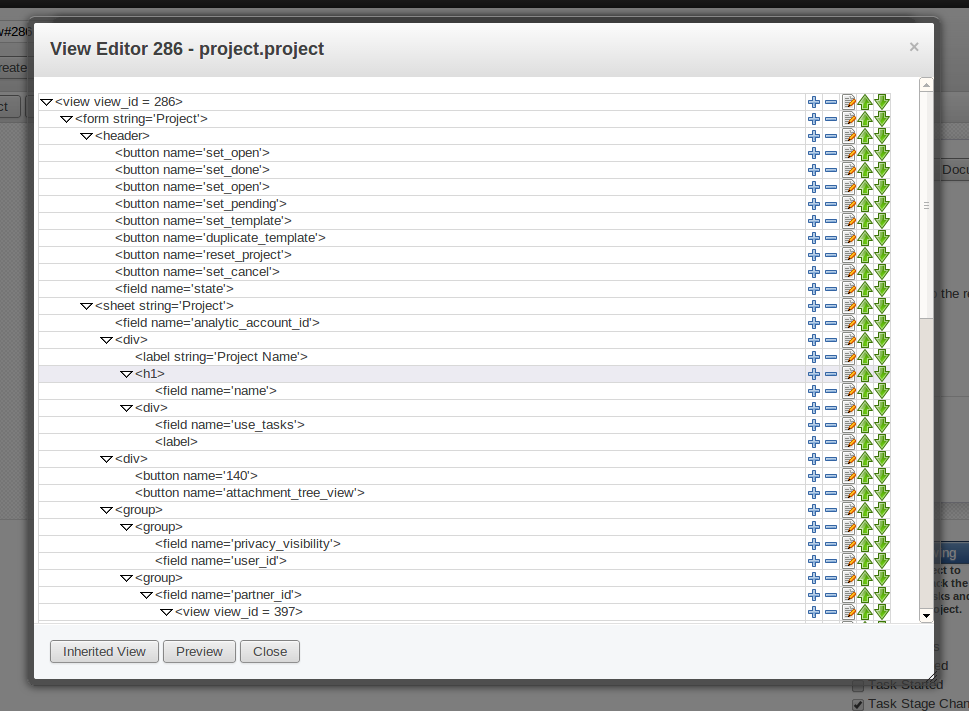
</openerp>Without getting into too much detail about the views the important pieces of this code are the record tag where we define our view’s id.
Next we have the view name, object (model) and a reference to the view we are inheriting.
Since, we are inheriting another modules view, we don't get to define this info, we have to look it up. To do this information, make sure developer mode is enabled, go to the view we are changing then in the developer drop down menu at the top click on Manage views You’ll see something like the following.
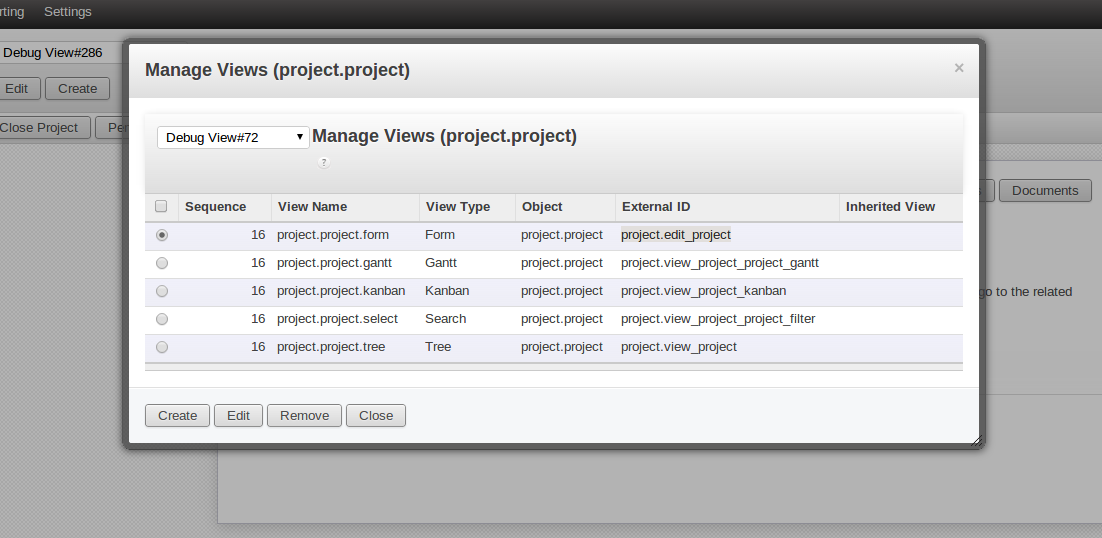
In the table you can see View name, Object and External ID these map to name, model and inherit_id respectfully.
The next section has an Xpath expression in it with the position attribute, this tells the system to put the field legacy_projects_id AFTER the node represented in the Xpath.
If you’re wondering how you figure out where you want to put the field. Use Development mode. While in the Manage views section, with the current view selected, click edit. That’s your view XML. Cool huh?
Cool, now make it work.
Ok, ok, enough with the details, let’s go turn this thing on. Navigate to Settings » Installed Modules. Click on the Update module list link on the left, and then like before search for your module. This time let's enable it.
NOTE: If the above doesn’t work, you may need to restart the server and then either update or uninstall/install your module
Things should whir away for a while and if all is well, your module will be enabled. Let’s go an create a new project and see, navigate to the Projects page and hit Create

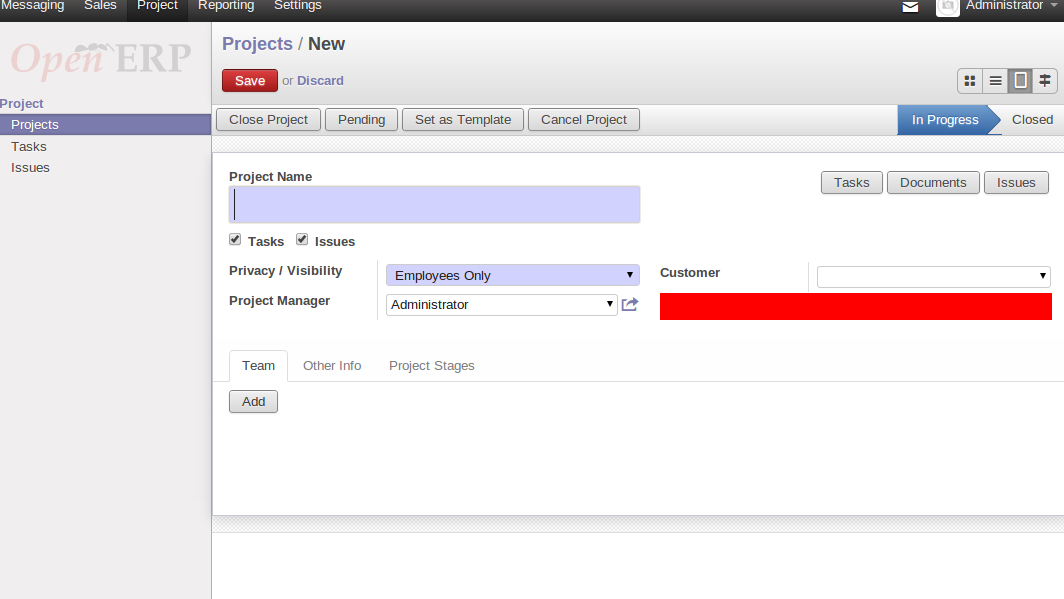
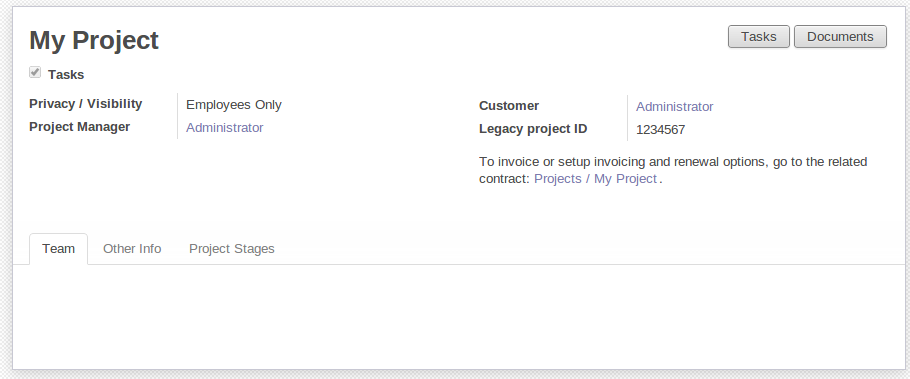
Bingo Look now we have a new field under the Customer field Legacy Project ID and hovering over it in developer mode, we can see it’s the field we created.
If we create a project and enter a value in this field it will be saved to the database, OpenERP does all the work for us. In fact this post seems awfully long for how little code we’ve actually done. Here is what our saved Project looks like.
Are you done yet?
So there you have it, doesn’t OpenERP look easy. :D Hopefully this tutorial has made sense and has been helpful. I’ve posted the source for the code in this tutorial on Github, there’s a link after the article. Let me know in the comments if you have any questions, or if you want me to cover another OpenERP topic.