Building custom content panes (aka ctools content types) in panels 3, and Drupal 7
Custom panes > blocks

Often on Drupal sites you need the ability to create re-usable panel panes for use on the site. Each panel pane would need custom configuration, and could even be context aware (aware of were they are placed on the site).
This is where ctools content types comes in. Ctools content types are one type of plugin that the ctools module provides. Out of the box, the ctools module provides a few content types to support core modules. These can be found in the git repository.
Advantages of ctools content types versus blocks
- You do not need administer blocks permission (which is very risky for content authors to have)
- Tight integration with panels and other panelizer. Using panelizer affords you the option of not giving away the 'administer panels' permission
- Custom configuration edit forms to allow the panes to be re-usable and to make sense for your content authors
- Developers can abstract away any complexity in code, leaving the content authors with only the job of adding the pane and configuring it
Unfortunately there is not a lot of documentation around content types, so I will go through a simple example with you.
Example implementation of ctools content type plugin
In this example I will go through creating a custom twitter timeline widget that can be configured to pull through a selected user's tweets, and with an option for limiting the number displayed.
Step 1: Create a new custom module with this in the .module file:
 <?php
 /**
  * Implements hook_ctools_plugin_directory().
  */
 function examplemodule_ctools_plugin_directory($owner, $plugin_type) {
   if ($owner == 'ctools' && $plugin_type == 'content_types') {
     return 'plugins/' . $plugin_type;
   }
 }
 ?>
Where the name of my custom module is examplemodule.
This lets ctools know that any file in the folder 'plugins/content_types/' should be parsed for content type plugins. This also keeps your code really nice.
Step 2: Create the include file for the plugin
mkdir -p plugins/content_types
cd plugins/content_types
vim twitter_timeline.inc
Notice the directory structure matches what was declared in the .module file.
Step 3: Declare the plugin to ctools
<?php
$plugin = array(
'single' => TRUE,
'title' => t('Twitter timeline'),
'description' => t('Shows a twitter timeline with basic configuration options.'),
'category' => t('Social media'),
'edit form' => 'examplemodule_twitter_timeline_edit_form',
'render callback' => 'examplemodule_twitter_timeline_render',
'admin info' => 'examplemodule_twitter_timeline_admin_info',
'defaults' => array(
'username' => 'wiifm',
'tweets_to_show' => 5,
)
);
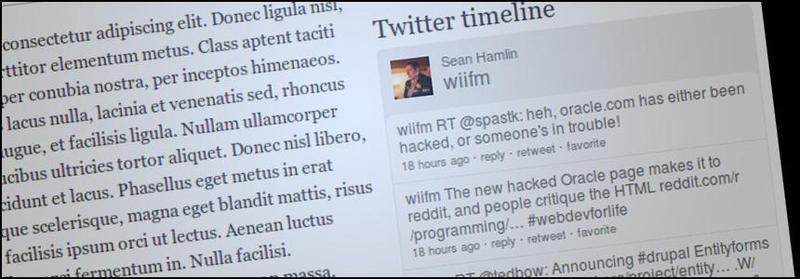
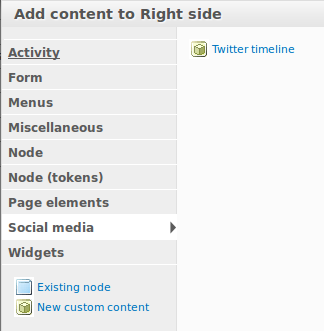
?>This piece of code lets ctools know what functions to call, what argument defaults there are and so fourth. It should be largely self explanatory. It also means that your pane will show up in panels now, as we can see from this picture:
Step 4: Implementing admin_info
Admin information is an optional function to implement that helps describe the pane when it is included on a panel. I would recommend always implementing it so your content authors can always see at a glance what configuration a particular pane has.
<?php
/**
* 'admin info' callback for panel pane.
*/
function examplemodule_twitter_timeline_admin_info($subtype, $conf, $contexts) {
if (!empty($conf)) {
$block = new stdClass;
$block->title = $conf['override_title'] ? $conf['override_title_text'] : '';
$block->content = t('Showing @tweets_to_show tweets from <em>@@username</em>.', array(
'@tweets_to_show' => $conf['tweets_to_show'],
'@username' => $conf['username'],
));
return $block;
}
}
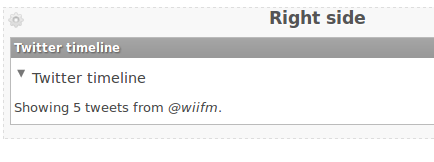
?>This is what the pane will look like after being configured
Step 5: Implementing the edit form
The heart of ctools content types is the ability to create simple configuration forms for your content authors so they can easily create and edit panes. Edit forms use standard form API, so they are really easy to make
 <?php
 /**
  * 'Edit form' callback for the content type.
  */
 function examplemodule_twitter_timeline_edit_form($form, &$form_state) {
   $conf = $form_state['conf'];

   $form['username'] = array(
     '#title' => t('Twitter username'),
     '#description' => t('The username of the twitter account in which to pull the tweets from.'),
     '#type' => 'textfield',
     '#default_value' => $conf['username'],
     '#required' => TRUE,
   );

   $form['tweets_to_show'] = array(
     '#title' => t('Number of tweets to show'),
     '#description' => t('Used to control the number of tweets shown on the page initially. Defaults to 5.'),
     '#type' => 'select',
     '#options' => drupal_map_assoc(range(3, 12)),
     '#default_value' => $conf['tweets_to_show'],
     '#required' => TRUE,
   );

   return $form;
 }
 ?>
In order to save the configuration back to the $conf storage for the pane, you will also need a submit handler
<?php
/**
* The submit form stores the data in $conf.
*/
function examplemodule_twitter_timeline_edit_form_submit($form, &$form_state) {
foreach (array_keys($form_state['plugin']['defaults']) as $key) {
if (isset($form_state['values'][$key])) {
$form_state['conf'][$key] = $form_state['values'][$key];
}
}
}
?>There you have it, now you can configure the pane username, and the amount of tweets to show, all of which have sane defaults and helpful descriptions for your content authors. This is what this step looks like:

Step 6: Implementing the render callback
This is the guts of the pane, and is responsible for producing markup to be rendered on the page. I have taken a simplitest approach to this and have not used a theme function (and template), in reality I would encourage this as well.
<?php
/**
* Run-time rendering of the body of the block (content type)
* See ctools_plugin_examples for more advanced info
*/
function examplemodule_twitter_timeline_render($subtype, $conf, $panel_args, $context = NULL) {
$block = new stdClass();
// initial content is blank
$block->title = '';
$block->content = '';
// Include twitter javascript - by linking to the external file.
drupal_add_js('//widgets.twimg.com/j/2/widget.js', 'external');
// Add in the content
$block->content .= '
<script type="text/javascript">
var t = new TWTR.Widget({
version: 2,
type: "profile",
rpp: ' . check_plain($conf['tweets_to_show']) . ',
interval: 30000,
width: "300",
height: "300",
theme: {
shell: {
background: "#ededed",
color: "#6a6a6a"
},
tweets: {
background: "#fafafa",
color: "#6a6a6a",
links: "#6a6a6a"
}
},
features: {
avatars: false,
hashtags: true,
scrollbar: false,
loop: true,
live: true,
behavior: "default"
}
});
t.render().setUser("' . check_plain($conf['username']) . '").start();
</script>';
return $block;
}
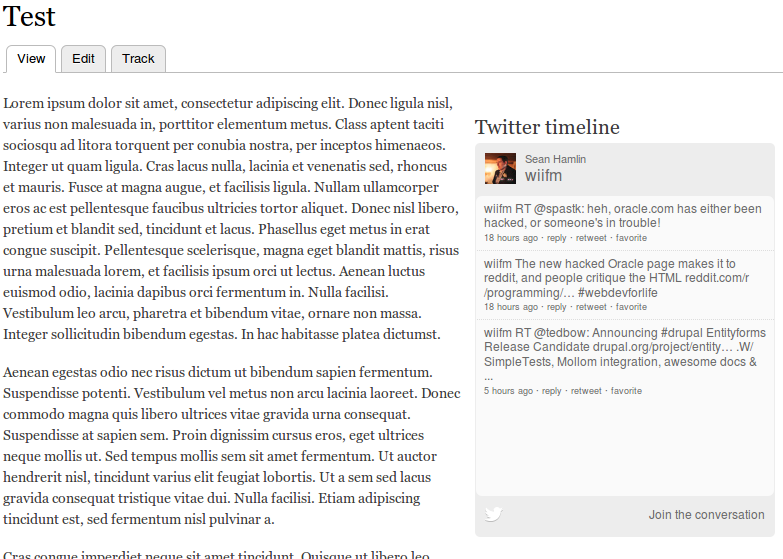
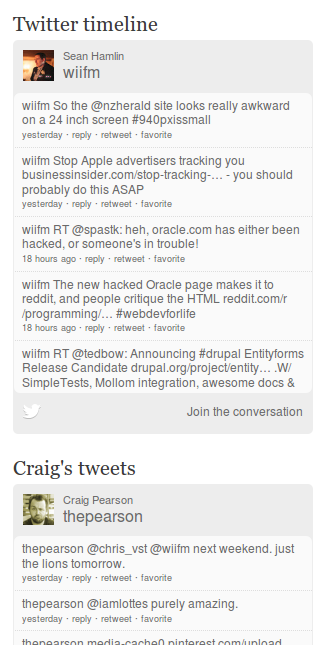
?>Here is a sample panel page, with the twitter timeline pane on the right hand side
And as you can imagine, it is relatively easy to add more panes onto the panel, here is another on the same page
Full module download
I thought this post might be a bit code heavy, so I decided to include the full source of the module in case you want to download and install it yourself. Feel free to rename it, extend it, do what you want with it.
Final thoughts
In this tutorial you have seen how easy it is to make a fully custom ctools content type plugin, from scratch. And hopefully begin to see how this is more powerful than traditional blocks.
What are your experiences with ctools content types, and helpful advice for others? Did this tutorial help you at all? Let me know in the comments.